|
FLATHEAD START-UP PROCEDURES FOR OLD MOTORS THAT HAVE BEEN
SITTING FOR A
LONG TIME
Read
completely before attempting to work on the vehicle
Use
good safety procedures to protect people and property
This
article may
miss a couple things, but
the following
are the
some of the usual recommendations:
1) Check oil for clean appearance. If very low, add
to full. If
overfull, drain out the excess. If it’s very thin or otherwise nasty
looking/smelling, drain and refill with new 10/30W. If oil looks dark but
ok, leave it
for now.
2) Loosen the generator/fan
assembly to allow lots of slack in
the belt
(or belts if a two-belt
system). Try to turn the water pump
pulleys by hand. Repeat
this test
on the generator pulley and
the fan assy.
If all parts
turn easily,
reset
the
tension in the belts by snugging
them back up.
If any of these rotating parts will not
turn easily,
leave the belt(s) loose.
You will not
need them to operate for a
brief motor start-up test
and they would just
restrict
the motor from turning over,
possibly burning up a belt
if it
starts.
3) Pull the spark plug
wire from the middle of the distributor to
the coil.
4) Check and clean up any battery terminal
connections. This
includes the ground strap from the firewall
or frame to the block. Use
a new or good, fully charged-up battery.
5) Make sure all primary ignition wires are
in place and that
there are no
bare un-insulated wires. If
you suspect
the wiring is
not
correctly hooked up,
stop here and refer to
the wiring
schematics at
www.vanpeltsales.com.
6) Remove all spark plugs. Have a look at
each. Clean
and re-gap, or replace as necessary. Most
Ford &
Mercury flathead V8’s
originally specified the
Champion
H-10 plug, but here are alternatives if so
desired. The gap should be between .025 and
.030”. Complete tune-up
information can be
found on the FlatheadV8.com
website as well.
7) Disconnect
the fuel line
from the fuel tank at
the fuel pump
for now. This steel line ends at
the firewall
and makes the final
connection
to the fuel pump through a short
length of flexible
fuel line. Disconnect
either end of the flex line.
This will prevent
the fuel pump
from pulling the old gas up into
the motor.
8) Make sure all rags, hands, tools, etc are clear
of
the motor fan, and
use the ignition starter switch to
turn over the engine. If
the starter hits but
won't
turn the motor over,
don’t
keep trying. Place
a socket
and large
breaker bar on the front
pulley nut
and try to
turn the motor over
manually, turning clockwise. If still stuck, you will
have to try using some
Marvel Mystery Oil in the cylinders to help loosen
things up. If the starter turns things over
ok, let
it
spin about
3 or 4 times, for about
five seconds
each time. This
will help circulate some oil back through the oil
galleys and bearings in the motor.
9) If motor spins ok,
put
the spark
plugs back in place and
tighten
them. Reconnect
all spark
plug wires including the distributor-to-coil wire.
10) You do NOT want
to try to run old,
dirty, gummy
gasoline into
the motor from the car's gas
tank if it
has been
there for more
than a year.
Rig up a portable marine
gas tank... a one
or two gallon tank (with fresh
gasoline) with a gravity hose connection and shut-off valve.
Connect
it
to the carb's
inlet
fitting with a length of neoprene
gas hose. You may have to make a hose barb fitting or something similar
for a
temporary
connection. Set
the tank up on the cowl and
secure it
to make sure it
can't
fall. It's a good
idea to remove the hood for
easy access and safety. Be sure
to have a
fire extinguisher
handy
and
do the start-up
out
in the
open. Do NOT attempt the start-up inside your garage, barn, or other
structure. Have a helper remain with you.
11) Open the valve in
your marine gas tank and let
gas flow into the carb. If
you see any raw gas leaking out
anywhere,
find
the problem
and fix it
BEFORE you try
to start
the motor. It
may also
help to have a can
of spray starting ether
to help
kick things off.
12) Make sure the car is in
NEUTRAL and wheels blocked and parking brake set
.
13) Try
to start
the motor. Don't
be surprised
if it
doesn’t
run smoothly. If you
have squirted any oil into
the cylinders,
you can expect
a big cloud of blue smoke when it
starts. Any old
gas in the carb may
prevent
it
from doing its job
properly. A carburetor rebuild
would be in order anyway. Also, you can have one or more stuck engine
valves (stuck open that
is) which will cause rough running and popping. You can address these problems
one at
a time. A valve
that is stuck closed could possible damage a stock lifter (poking a hole
in the top).
14) If the motor starts and runs
ok, just
let
it
go long
enough to warm up
the oil. If
you hear any drastic, horrible sounds (something banging
or clanging or loud screeching) stop the engine
immediately and try to locate the problem.
If it
runs ok, stop the engine,
drain
the old oil,
and replace it
(unless you have already done this
procedure). Use a good, detergent
type oil, but
consider
using a non-detergent
oil on an
old used motor (to prevent
the loosening
and flushing of old sludge particles
that
may block up
an oil passage somewhere else). If your motor has
the accessory
oil filter cannister, replace
the filter element
inside. After
the oil
change, you can start
it
up again
to let
it
warm up
the rest
of the way. You
should watch for other problems
such as leaking coolant
, leaking motor oil,
overheating, etc.
Things
to
watch
for:
Gasoline leaks, antifreeze
leaks, sparking/shorting wires. You should figure on pulling
the gas tank later and having
it
professionally boiled out
and resealed. Don’t
skimp on the
steel fuel lines
either. Chances
are, they are as
old as
the car and
certainly can
have rust
internally
as
well, so replace them also. Add an in-line fuel filter before
the fuel pump.
Replace
the fuel pump
and the little flexible fuel
line on the firewall also. They both have gas resistant
rubberized
components
that
do fail with age. Get
the carb
rebuilt. Consider putting new ignition points and
condenser in. Perhaps
the coil as well.
If you have a strong battery and the starter won’t
spin, check the starting relay. As
a brief test, you can
connect
6 or 12 volts directly
to
the starter
to check
to see if it
will
turn.
Be sure to use heavy 00 cables. The
original Ford starters ran on 6
volts (positive ground)
but
will still spin
correctly if
the ground is
reversed. They will also handle 12 volts….
they just
spin faster.
Although it
is difficult
to detect, mice can get
into the exhaust
pipe and
camp out
way up toward
the motor. This can
cause
the motor to stall out, run hot, or run
poorly. A stuck-closed
heat
riser damper
valve, if equipped on your vehicle, (located between the exhaust
manifold and
the exhaust
drop pipe)
will do the same thing. When the motor starts, have a
helper check the exhaust
pipe outlet
for the feel of
exhaust
gases
pushing out. You may
have some exhaust
system work to do!
Things
to
Replace:
§
Flexible Fuel Line between
the fuel
pump and steel fuel
line. (Old flex lines can have cracks, preventing the suction of fuel
up from
the tank to the fuel
pump).
§
Fuel Pump (rebuild if you know how and have the parts, otherwise
replace. Old pumps often have cracked diaphragms, which might
still pump
gas, but
could let
some gas
leak down into the crankcase,
diluting the oil).
§
Engine oil. (Want
to do it
right
? Pull the pan and
scoop out
the old oil
sludge, especially the inlet
screen of the oil pump.
You can unbolt
the pickup tube &
screen and soak it, blow it
out, etc). Replace
the pan gasket
.
§
Vehicle
wiring with stiff or
cracked insulation. (Old car
wiring is a fire waiting to happen.
Even if your vehicle still fires up and runs, if the wiring is
more than 20 years
old or has obviously been tampered with or altered, replace
it).
§
Ignition system (plugs,
wires, points, condenser,
coil, cap, and rotor. Beware of cheap replacement
ignition parts….
they are well
known to have defects right
out
of the box. Caps,
coils, and condensers are particularly
suspect
). The old
points may be ok, but just need cleaning of the contact surfaces.
If you get
the motor running, don't
be tempted to drive the car around until you've had a chance
to check the brakes. If the motor turns over but
won’t
start, you will have
to begin a standard
troubleshooting procedure (often found in old MOTOR
MANUALS or CHILTONS REPAIR MANUALS) to locate the problem. In general, try not
to make assumptions about
the state of your motor, or slapping on
replacement
parts everywhere, hoping to solve the problem. Don’t
use the “dartboard” approach to troubleshooting.
Gas engines can be checked for some issues very easily. Two common basic
problems are lack of fuel and lack of ignition (or badly timed ignition). Assuming these are ok, you need
to check for compression.
Many owners don’t
seem to locate the answers to the FUEL and IGNITION questions very easily. Here
are a couple tips for each:
FUEL:
Always start
by checking for gas in the tank. Then if
you know there is gas in the tank,
continue on with removing the air filter, looking down the carb, working the throttle linkage, and watching for small sprays of
gas down into the throats of the carbs, If I see the squirts of gas, I know the carb has fuel in the bowl. This means the fuel pump and fuel
lines have delivered gas to the carb. It’s NOT a complete test
of the fuel delivery system, but
is enough to show that
there is enough gas to fire off an engine. A
sniff of gas in the carb is another
tell-tale.
If the carb does not
show any gas, it
may not
have any in the bowl. Removing the top screws on the carb body will reveal the float
chamber and float
assembly. If it’s full of gas, the accelerator pump mechanism (the gas “squirter”) may be worn out
. If the bowl is empty but
the float
is stuck in the UP position, the needle valve on
the inlet
will prevent
gas from coming into the bowl. Try to free up
the float, replace the top cover and see if gas
will flow in the carb. A sunk float
is no good either as it
will allow the fuel pump to over-deliver gasoline
into the carb, causing flooding
and
rich
operation. If the gas is still liquid but
smells like old varnish,
remove the carb, drain the old gas, and replace
with fresh gas. Gummy old
gasoline in the bowl means there will be more of the same in the tiny passages of the carb. A carburetor
rebuild is in order.
The fuel pump may not
be working but
that
is why I recommend using a
temporary fuel
tank that
is connected directly to the carb. The motor might
run from this
temporary set
up, but
not
run when connected to the vehicle’s fuel system. Rusted tanks, clogged pickup tubes, cracked flexible
fuel line, plugged filters (if so equipped) and defective fuel pumps can
all be at
fault
…..individually or
collectively. Going back to my earlier notes, you should replace the old system components rather than guessing which is bad
and allowing dirt
to make it
up to your carburetor.
IGNITION:
A quick review of your car’s basic ignition wiring system is not
a bad idea. With the diagram in hand, you
can observe the various wires to see if they are connected to their proper locations. Spark plug wiring
should be checked for correct
firing order. The diagrams below shows the 1949-53 set
up. Refer to the FLATHEADV8.COM website for the 1932 to 48 diagrams.
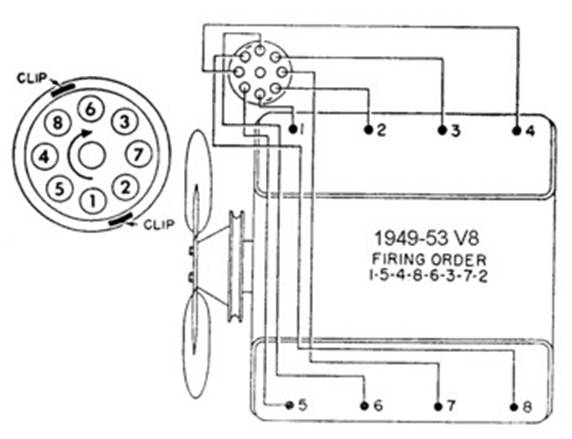
Note that
ALL Ford and Mercury flat
head V8 engines (from
1932 to 53) had the same firing order
(1-5-4-8-6-3-7-2) as shown above. All were 6 volt
positive ground systems. Many have been
converted to 12 volt
negative ground. This meant
a reversing of the leads to the coil. If incorrectly wired, the coil will still produce voltage but
it
won’t
be at
full strength.
After you have pulled all
spark plugs and cleaned and re-gapped them (or replaced them) you can perform a
simple spark test
. Remove any plug (I
generally use the #1 since I also want
to check the distributor for matching up the rotor to the #1). It’s best
to try this in a well shaded or
dark area. With the wire fully connected, grasp the spark plug with insulated pliers (I use gloves
as well). Hold the plug’s metal base against
the block or manifold, and
crank over the engine. You should see
a spark at
the plug gap. A good strong spark will easily
jump the gap and be multi-colored. If you have no
spark, you will have to work your way back through the ignition system to find the problem. Do you have voltage to the coil? Are the distributor points clean and burr-free?
Are all wires properly connected and insulated? A bad coil or bad condenser are easy to replace with known quality units for test
purposes. If the points are suspect, replace and adjust
the new ones to spec. Is the cap cracked or does it
have heavy carbon track inside the
top? Is the rotor busted or burnt
at
its contacts?
You may have good spark but
if the motor is out
of
time, it
won’t
be delivered at
the
right moment
for proper detonation of the fuel. This will
require checking the timing. There were three different
basic distributors used for flathead V8’s over the years. You can find tune-up info on these on the website as well.
If the motor has very poor
compression in all cylinders it
will be hard to start. However, many flatheads were known to start
and run with very low compression. A
new motor or fresh rebuild
should show around 105 to 110 lbs of compression on a crank test
. An obvious thing to look for is loose head
bolts (or studs) from a previous attempt
to remove the heads. Tighten the heads with the correct
torque and sequence (see
website). Remove all the spark plugs. Check
compression with a proper gauge, one
cylinder at
a time. Prop open the carb throttle when cranking the engine over to determine the pressure for each
cylinder. Record these readings by cylinder
number for future reference.
With
the motor running, you can also use a vacuum gauge to diagnose many engine
problems. The chart for vacuum gauge readings is linked below. Refer to
the chart for specific tests.
Vacuum
Gauge Readings
Return
to VANPELTSALES.COM
Copyright 2023 - VANPELT
SALES LLC - All rights reserved |